Can Your Platform Do Policy? Accelerate Teams With Platform L7 Policy Functionality
Is policy your core competency? Likely not, but you need to do right. Do it once with Istio and OPA and get back team focus on what matters most.
Shared computing platforms offer resources and shared functionality to tenant teams so that they don’t need to build everything from scratch themselves. While it can sometimes be hard to balance all the requests from tenants, it’s important that platform teams ask the question: what’s the highest value feature we can offer our tenants?
Often work is given directly to application teams to implement, but there are some features that are best implemented once, and offered as a service to all teams. One feature within the reach of most platform teams is offering a standard, responsive system for Layer 7 application authorization policy. Policy as code enables teams to lift authorization decisions out of the application layer into a lightweight and performant decoupled system. It might sound like a challenge, but it doesn’t have to be, with the right tools for the job.
We’re going to dive into how Istio and Open Policy Agent (OPA) can be used to enforce Layer 7 policies in your platform. We’ll show you how to get started with a simple example. You will come to see how this combination is a solid option to deliver policy quickly and transparently to application team everywhere in the business, while also providing the data the security teams need for audit and compliance.
Try it out
When integrated with Istio, OPA can be used to enforce fine-grained access control policies for microservices. This guide shows how to enforce access control policies for a simple microservices application.
Prerequisites
- A Kubernetes cluster with Istio installed.
- The
istioctlcommand-line tool installed.
Install Istio and configure your mesh options to enable OPA:
$ istioctl install -y -f - <<'EOF'
apiVersion: install.istio.io/v1alpha1
kind: IstioOperator
spec:
  meshConfig:
    accessLogFile: /dev/stdout
    accessLogFormat: |
      [OPA DEMO] my-new-dynamic-metadata: "%DYNAMIC_METADATA(envoy.filters.http.ext_authz)%"
    extensionProviders:
    - name: "opa.local"
      envoyExtAuthzGrpc:
        service: "opa.opa.svc.cluster.local"
        port: "9191"
EOF
Notice that in the configuration, we define an extensionProviders section that points to the OPA standalone installation.
Deploy the sample application. Httpbin is a well-known application that can be used to test HTTP requests and helps to show quickly how we can play with the request and response attributes.
$ kubectl create ns my-app
$ kubectl label namespace my-app istio-injection=enabled

$ kubectl apply -f https://raw.githubusercontent.com/istio/istio/release-1.25/samples/httpbin/httpbin.yaml -n my-app
Deploy OPA. It will fail because it expects a configMap containing the default Rego rule to use. This configMap will be deployed later in our example.
$ kubectl create ns opa
$ kubectl label namespace opa istio-injection=enabled

$ kubectl apply -f - <<EOF
apiVersion: apps/v1
kind: Deployment
metadata:
  labels:
    app: opa
  name: opa
  namespace: opa
spec:
  replicas: 1
  selector:
    matchLabels:
      app: opa
  template:
    metadata:
      labels:
        app: opa
    spec:
      containers:
      - image: openpolicyagent/opa:0.61.0-envoy
        name: opa
        args:
          - "run"
          - "--server"
          - "--disable-telemetry"
          - "--config-file=/config/config.yaml"
          - "--log-level=debug" # Uncomment this line to enable debug logs
          - "--diagnostic-addr=0.0.0.0:8282"
          - "/policy/policy.rego" # Default policy
        volumeMounts:
          - mountPath: "/config"
            name: opa-config
          - mountPath: "/policy"
            name: opa-policy
      volumes:
        - name: opa-config
          configMap:
            name: opa-config
        - name: opa-policy
          configMap:
            name: opa-policy
---
apiVersion: v1
kind: ConfigMap
metadata:
  name: opa-config
  namespace: opa
data:
  config.yaml: |
    # Here the OPA configuration you can find in the offcial documention
    decision_logs:
      console: true
    plugins:
      envoy_ext_authz_grpc:
        addr: ":9191"
        path: mypackage/mysubpackage/myrule # Default path for grpc plugin
    # Here you can add your own configuration with services and bundles
---
apiVersion: v1
kind: Service
metadata:
  name: opa
  namespace: opa
  labels:
    app: opa
spec:
  ports:
    - port: 9191
      protocol: TCP
      name: grpc
  selector:
    app: opa
---
EOF
Deploy the AuthorizationPolicy to define which services will be protected by OPA.
$ kubectl apply -f - <<EOF
apiVersion: security.istio.io/v1
kind: AuthorizationPolicy
metadata:
  name: my-opa-authz
  namespace: istio-system # This enforce the policy on all the mesh being istio-system the mesh config namespace
spec:
  selector:
    matchLabels:
      ext-authz: enabled
  action: CUSTOM
  provider:
    name: "opa.local"
  rules: [{}] # Empty rules, it will apply to selectors with ext-authz: enabled label
EOF
Let’s label the app to enforce the policy:
$ kubectl patch deploy httpbin -n my-app --type=merge -p='{
  "spec": {
    "template": {
      "metadata": {
        "labels": {
          "ext-authz": "enabled"
        }
      }
    }
  }
}'
Notice that in this resource, we define the OPA extensionProvider you set in the Istio configuration:
[...]
  provider:
    name: "opa.local"
[...]
How it works
When applying the AuthorizationPolicy, the Istio control plane (istiod) sends the required configurations to the sidecar proxy (Envoy) of the selected services in the policy. Envoy will then send the request to the OPA server to check if the request is allowed or not.
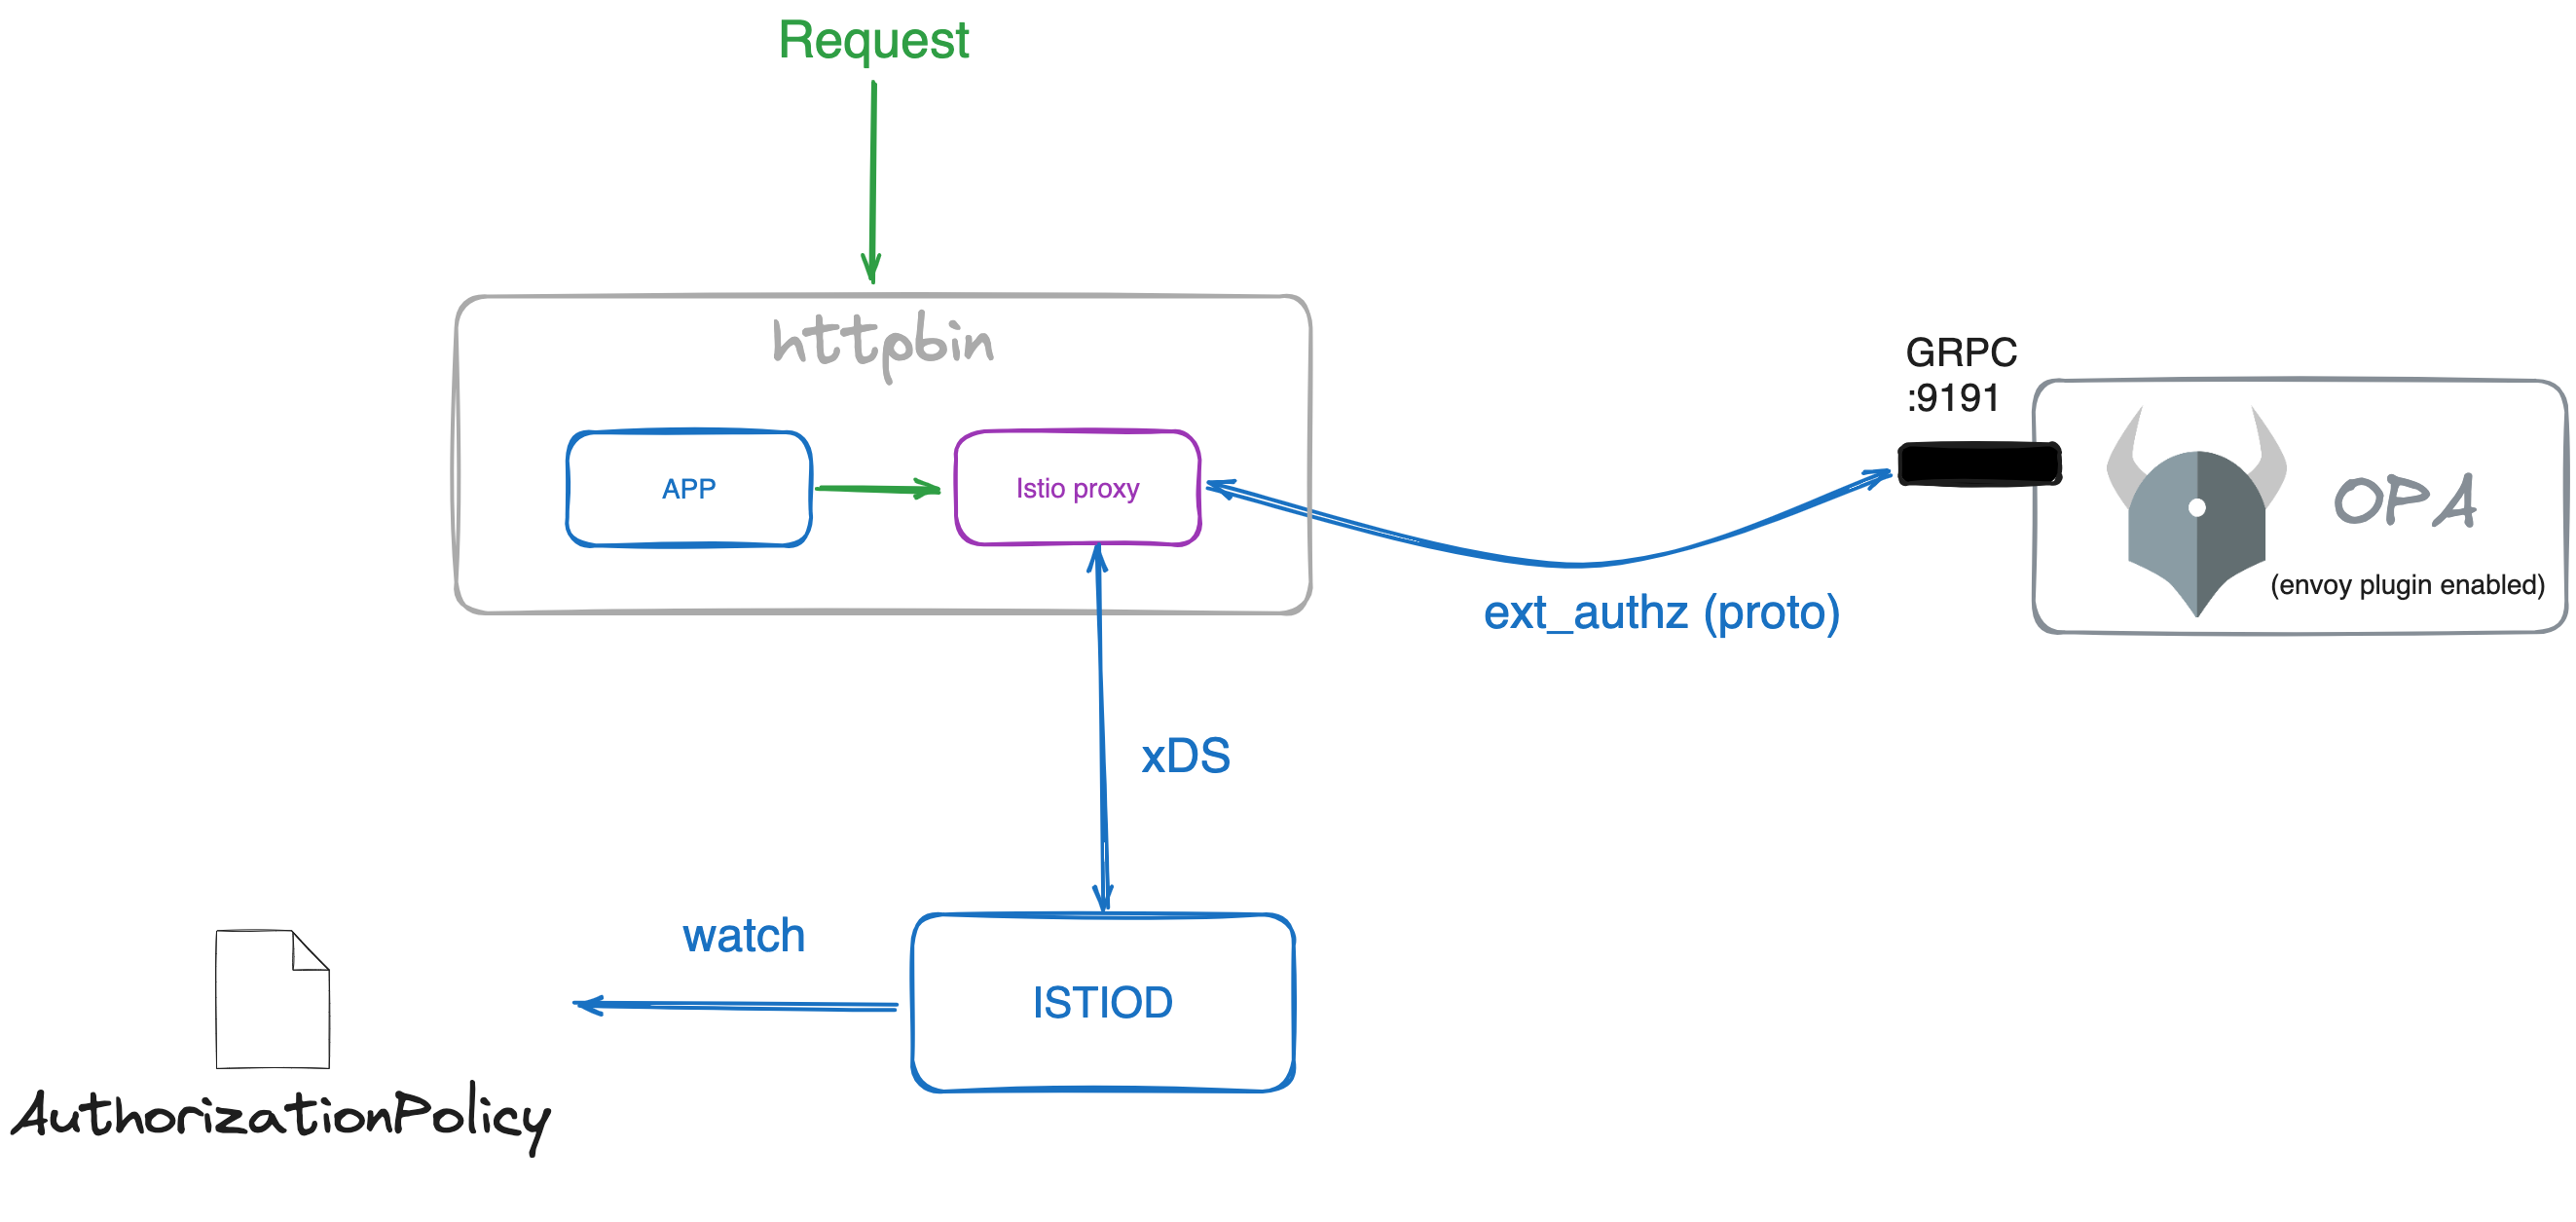
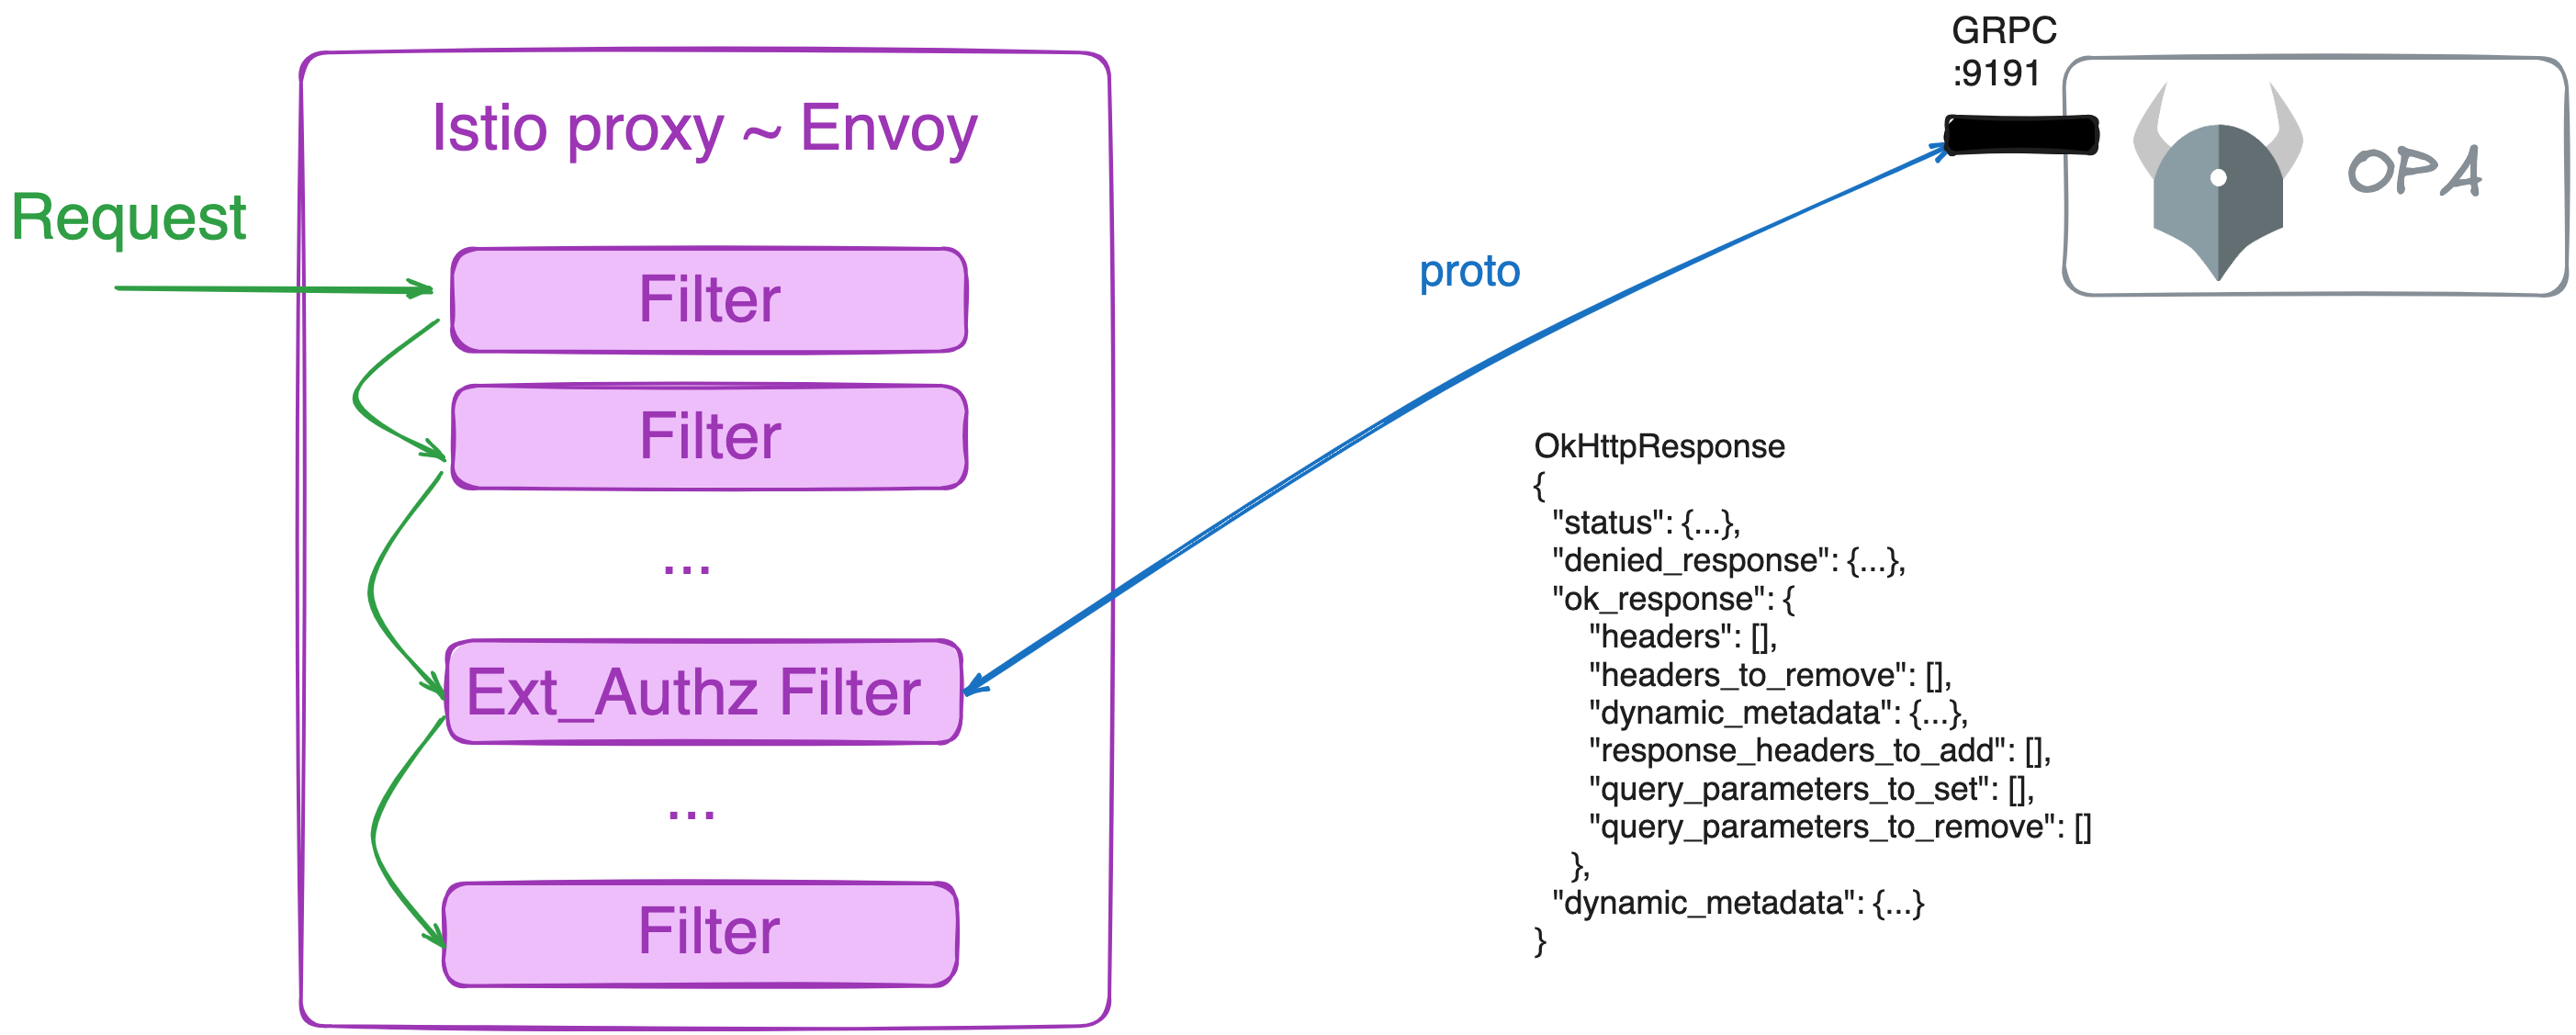
The Envoy proxy works by configuring filters in a chain. One of those filters is ext_authz, which implements an external authorization service with a specific message. Any server implementing the correct protobuf can connect to the Envoy proxy and provide the authorization decision; OPA is one of those servers.
Before, when you installed OPA server, you used the Envoy version of the server. This image allows the configuration of the gRPC plugin which implements the ext_authz protobuf service.
[...]
      containers:
      - image: openpolicyagent/opa:0.61.0-envoy # This is the OPA image version which brings the Envoy plugin
        name: opa
[...]
In the configuration, you have enabled the Envoy plugin and the port which will listened to:
[...]
    decision_logs:
      console: true
    plugins:
      envoy_ext_authz_grpc:
        addr: ":9191" # This is the port where the envoy plugin will listen
        path: mypackage/mysubpackage/myrule # Default path for grpc plugin
    # Here you can add your own configuration with services and bundles
[...]
Reviewing Envoy’s Authorization service documentation, you can see that the message has these attributes:
OkHttpResponse
{
  "status": {...},
  "denied_response": {...},
  "ok_response": {
      "headers": [],
      "headers_to_remove": [],
      "dynamic_metadata": {...},
      "response_headers_to_add": [],
      "query_parameters_to_set": [],
      "query_parameters_to_remove": []
    },
  "dynamic_metadata": {...}
}
This means that based on the response from the authz server, Envoy can add or remove headers, query parameters, and even change the response status. OPA can do this as well, as documented in the OPA documentation.
Testing
Let’s test the simple usage (authorization) and then let’s create a more advanced rule to show how we can use OPA to modify the request and response.
Deploy an app to run curl commands to the httpbin sample application:
$ kubectl -n my-app run --image=curlimages/curl curl -- /bin/sleep 100dApply the first Rego rule and restart the OPA deployment:
$ kubectl apply -f - <<EOF
apiVersion: v1
kind: ConfigMap
metadata:
  name: opa-policy
  namespace: opa
data:
  policy.rego: |
    package mypackage.mysubpackage

    import rego.v1

    default myrule := false

    myrule if {
      input.attributes.request.http.headers["x-force-authorized"] == "enabled"
    }

    myrule if {
      input.attributes.request.http.headers["x-force-authorized"] == "true"
    }
EOF
$ kubectl rollout restart deployment -n opaThe simple scenario is to allow requests if they contain the header x-force-authorized with the value enabled or true. If the header is not present or has a different value, the request will be denied.
There are multiple ways to create the Rego rule. In this case, we created two different rules. Executed in order, the first one which satisfies all the conditions will be the one that will be used.
Simple rule
The following request will return 403:
$ kubectl exec -n my-app curl -c curl -- curl -s -w "\nhttp_code=%{http_code}" httpbin:8000/getThe following request will return 200 and the body:
$ kubectl exec -n my-app curl -c curl -- curl -s -w "\nhttp_code=%{http_code}" httpbin:8000/get -H "x-force-authorized: enabled"Advanced manipulations
Now the more advanced rule. Apply the second Rego rule and restart the OPA deployment:
$ kubectl apply -f - <<EOF
apiVersion: v1
kind: ConfigMap
metadata:
  name: opa-policy
  namespace: opa
data:
  policy.rego: |
    package mypackage.mysubpackage

    import rego.v1

    request_headers := input.attributes.request.http.headers

    force_unauthenticated if request_headers["x-force-unauthenticated"] == "enabled"

    default allow := false

    allow if {
      not force_unauthenticated
      request_headers["x-force-authorized"] == "true"
    }

    default status_code := 403

    status_code := 200 if allow

    status_code := 401 if force_unauthenticated

    default body := "Unauthorized Request"

    body := "Authentication Failed" if force_unauthenticated

    myrule := {
      "body": body,
      "http_status": status_code,
      "allowed": allow,
      "headers": {"x-validated-by": "my-security-checkpoint"},
      "response_headers_to_add": {"x-add-custom-response-header": "added"},
      "request_headers_to_remove": ["x-force-authorized"],
      "dynamic_metadata": {"my-new-metadata": "my-new-value"},
    }
EOF
$ kubectl rollout restart deployment -n opaIn that rule, you can see:
myrule["allowed"] := allow # Notice that `allowed` is mandatory when returning an object, like here `myrule`
myrule["headers"] := headers
myrule["response_headers_to_add"] := response_headers_to_add
myrule["request_headers_to_remove"] := request_headers_to_remove
myrule["body"] := body
myrule["http_status"] := status_code
Those are the values that will be returned to the Envoy proxy from the OPA server. Envoy will use those values to modify the request and response.
Notice that allowed is required when returning a JSON object instead of only true/false. This can be found in the OPA documentation.
Change returned body
Let’s test the new capabilities:
$ kubectl exec -n my-app curl -c curl -- curl -s -w "\nhttp_code=%{http_code}" httpbin:8000/getNow we can change the response body. With 403 the body in the Rego rule is changed to “Unauthorized Request”. With the previous command, you should receive:
Unauthorized Request
http_code=403
Change returned body and status code
Running the request with the header x-force-authorized: enabled you should receive the body “Authentication Failed” and error “401”:
$ kubectl exec -n my-app curl -c curl -- curl -s -w "\nhttp_code=%{http_code}" httpbin:8000/get -H "x-force-unauthenticated: enabled"Adding headers to request
Running a valid request, you should receive the echo body with the new header x-validated-by: my-security-checkpoint and the header x-force-authorized removed:
$ kubectl exec -n my-app curl -c curl -- curl -s httpbin:8000/get -H "x-force-authorized: true"Adding headers to response
Running the same request but showing only the header, you will find the response header added during the Authz check x-add-custom-response-header: added:
$ kubectl exec -n my-app curl -c curl -- curl -s -I httpbin:8000/get -H "x-force-authorized: true"Sharing data between filters
Finally, you can pass data to the following Envoy filters using dynamic_metadata. This is useful when you want to pass data to another ext_authz filter in the chain or you want to print it in the application logs.
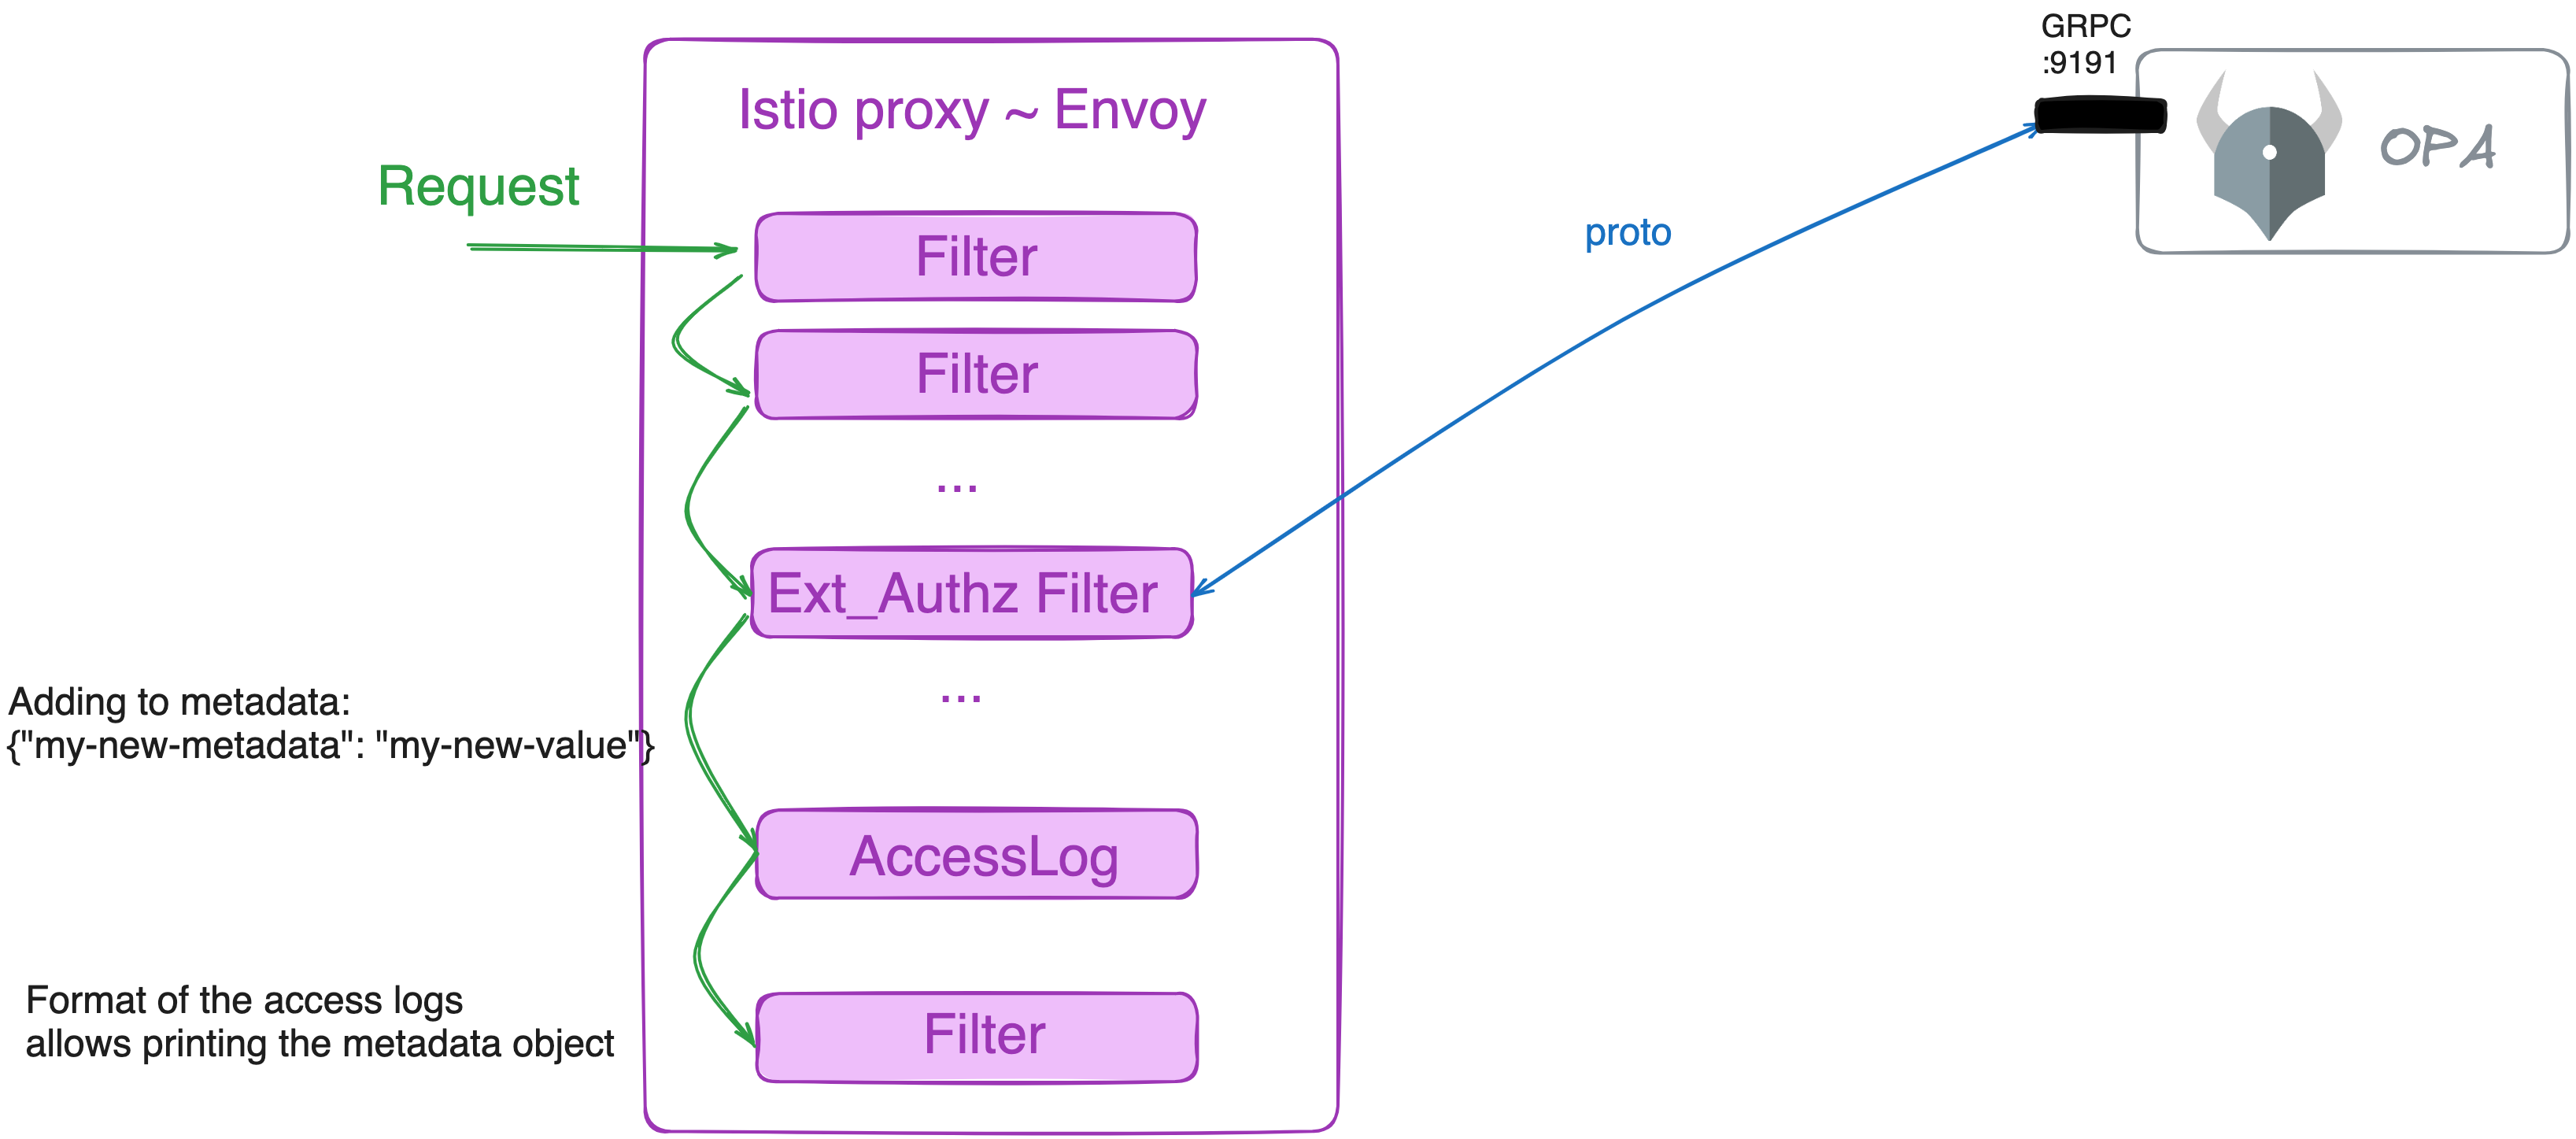
To do so, review the access log format you set earlier:
[...]
    accessLogFormat: |
      [OPA DEMO] my-new-dynamic-metadata: "%DYNAMIC_METADATA(envoy.filters.http.ext_authz)%"
[...]
DYNAMIC_METADATA is a reserved keyword to access the metadata object. The rest is the name of the filter that you want to access. In your case, the name envoy.filters.http.ext_authz is created automatically by Istio. You can verify this by dumping the Envoy configuration:
$ istioctl pc all deploy/httpbin -n my-app -oyaml | grep envoy.filters.http.ext_authzYou will see the configurations for the filter.
Let’s test the dynamic metadata. In the advance rule, you are creating a new metadata entry: {"my-new-metadata": "my-new-value"}.
Run the request and check the logs of the application:
$ kubectl exec -n my-app curl -c curl  -- curl -s -I httpbin:8000/get -H "x-force-authorized: true"
$ kubectl logs -n my-app deploy/httpbin -c istio-proxy --tail 1
You will see in the output the new attributes configured by OPA Rego rules:
[...]
 my-new-dynamic-metadata: "{"my-new-metadata":"my-new-value","decision_id":"8a6d5359-142c-4431-96cd-d683801e889f","ext_authz_duration":7}"
[...]
Conclusion
In this guide, we have shown how to integrate Istio and OPA to enforce policies for a simple microservices application. We also showed how to use Rego to modify the request and response attributes. This is the foundational example for building a platform-wide policy system that can be used by all application teams.


